
Here’s a pumpkin project that I did last year with my Stamp Club:
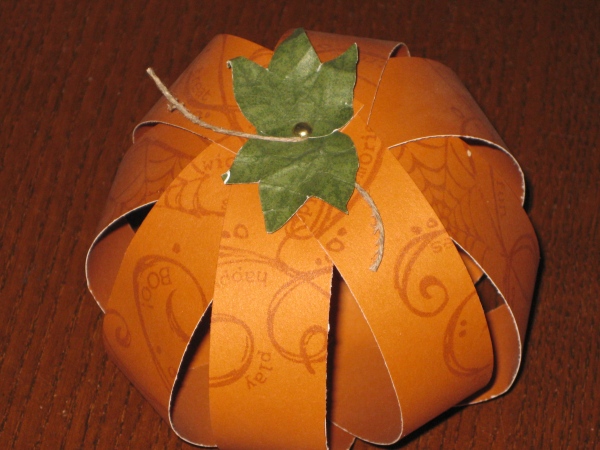
We simply stamped some Autumn Terracotta CS with the Creepy Cobwebs stamp set (tone on tone) and then cut into strips. We then layered one end of all the CS strips and fastened it together with a brad. Then repeated the same process on the other end. Stamped and cut out some leaves, added some hemp and affixed those by removing the brad and repositioning it through all layers (the leaves and the pumpkin strips).
Then a few weeks later Jeanette blogged about a very similar concept only using a terracotta pot as the base. I thought–“oh, man have I got to try that!” And so I did. Here is the result:
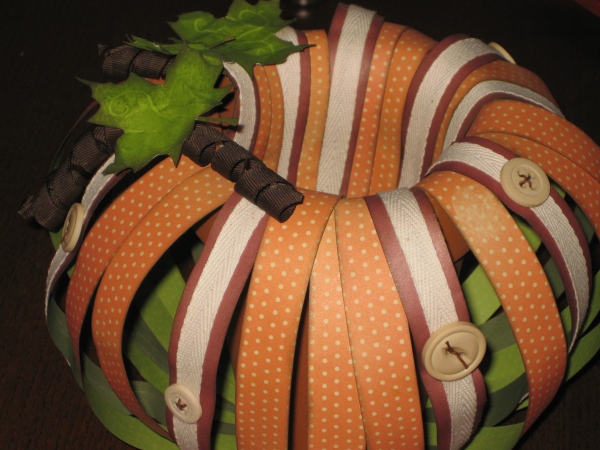
I love this concept so much better because it actually can be functional (beyond the obvious beauty of using it as decor). You can fill the center with candies, nuts, pretzels, or whatnot. (note: just be sure to line the bowl with some Saran Wrap or similar if the item might leave grease stains–don’t want to ruin all your hard work now do we!?!?)
With this particular pumpkin (which is a tall 4″ size pot) I cut up 24 total strips of 1/2″ x 12″ B&T paper. I sponged the edges of the Sunset Polka Dot B&Ts and then adhered twill ribbon to the Barn Red B&T. I strung Chocolate Waxy Flax through various Bamboo buttons found in our Basic Button Collection and then used Liquid Glass to adhere them to the twill. Going one by one, I adhered one end of each strip to the bottom of the pot with a Glue Dot and then the other end also with a Glue Dot to the inside of the pot. Continue until all strips have been adhered.
You can leave your pumpkin as it is or add additional embellishments. I chose to stamp some leaves from Many Thanks and cut out. I then crinkled them by squishing them in my hands a few times. Add in some curled Cocoa Grograin Ribbon and you’re all done!