

Okay if you are like me, when you saw my title of “a how-to process for organizing your photos” you got really interested, right? Maybe even a little excited by the prospect of finally getting a little sense of order to all your photos? Well, I’m right there with you, my friends! So that’s why I couldn’t wait to share Close To My Heart’s blog post with you today.
When it comes to scrapbooking, one of the biggest deterrents for people is feeling overwhelmed by their copious amounts of unorganized photos. If you have years of memories piled up in your phone’s photo gallery, or spread between multiple devices even, it’s easy to feel discouraged and to put off preserving these moments in a much more user-friendly format. The longer you wait to sort and organize your photos, the more memories you’ll collect, and the more overwhelming the task will get—so let’s not delay and start now. Let us show you how!
Follow the step-by-step outline we’ve created, below, as we walk you through how to efficiently organize your digital photos and get them into a scrapbook! This process may take some commitment, but the journey is worth it—especially when your memories are all in order and in an album where they can be relived and shared!
Step One: Consolidate Your Digital Photos
Upload all of your digital photos to one location—your computer. We recommend using a photo managing system, like Google Photos, Amazon Photos, or iCloud, to easily transfer photos from your phone and other devices onto your computer. Amazon Photos is free* for Amazon Prime members and iCloud is best for those with multiple Apple devices (it is included on iPhones, iPads, and Macs), where it automatically updates between the Apple devices. (*As of the date of this article, this information is correct but is subject to change without our knowledge.)
Step Two: Eliminate Unwanted Photos
Once all of your photos are in one place, go through and eliminate any that aren’t worth keeping: repeats, photos with a blurry finger covering half the lens, photos of your to-do lists, etc.
A few tips: Avoid future photo hoarding by cleansing your digital photo libraries every few weeks. (Set a reminder on your schedule if you have to!) On the same note, while it’s a good idea to get in the habit of deleting subpar photos soon after you take them, don’t consider every photo that isn’t “Instagram worthy” subpar. Pause before you hit delete and allow a photo to sit for a while—especially photos of yourself (we can be so harsh on ourselves!). You might be surprised at how much joy a picture can recall regardless of how unprofessional it may appear or how much you might have hated looking at yourself when you first snapped the photo.
Step Three: Organize Your Digital Photos
In your photo managing system, create folders for each year of photos you have. Then place the corresponding photos in these folders. Once you’ve sorted your photos by year, go into each folder and create subfolders. You can label and further sort your photos by month, event, vacation, etc.
Step Four: Back Up Your Digital Photos
Back up all the photos in your photo managing system onto an external hard drive and/or a safe permanent online cloud service. You may be using a safe online cloud storage solution to sort your photos. Just make sure you also have a backup!
Step Five: Create To-Print Folders
Once you have organized your photos in your photo managing system, you’re ready to start thinking about scrapbooking them—woohoo! Even though all the photos you have left are photos you have deemed worth keeping, you may not want to scrapbook all of them. A great way to figure out which photos you want to scrapbook is to copy and paste a given folder onto your desktop. (Copy and paste, don’t just drag. We don’t want to permanently delete photos in this step.) Go through and delete any photos from this folder you don’t want to print and put in an album. This is also a good time to edit any of the photos you’re going to print, if you want to take that extra step.
Step Six: Upload & Print Photos
Once you’ve gone through all the photos on your desktop folder, you’re ready to print! We recommend creating a table, like the one below, to track each folder’s progress. When you have printed your photos, you can delete the desktop folder you created (remember, you’ve already saved these photos elsewhere!).
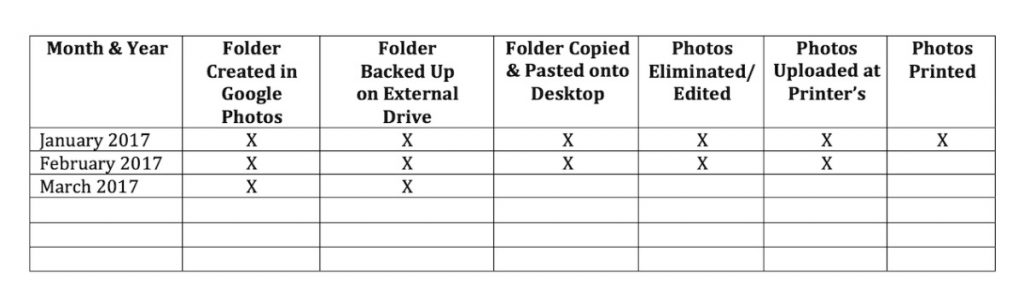
Tip: Choose one day every month to do a print run. Some months you may be able to afford printing more photos than other months. Whatever the circumstance, try and get in the habit of printing your photos on the same day each month.
Step Seven: Organize Printed Photos
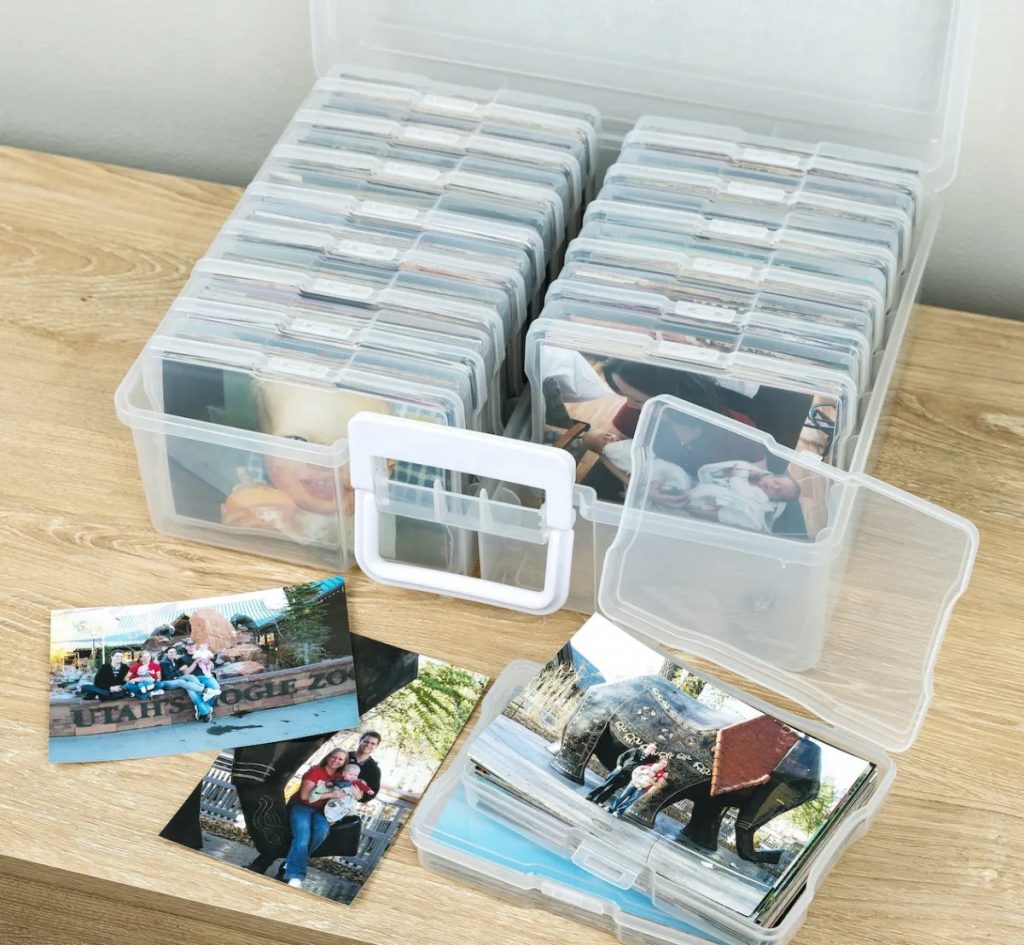
Option 1: Use our photo organizer to sort and keep your printed photos.
You can organize your photos by date, person, event…whatever you want! Think about the album you want to create with the photos, and sort them into each case that way.

The photo organizer comes with 16 removable snap-close cases that can each hold up to 100 4″ x 6″ photos, while the sturdy large exterior case snaps close and comes with a convenient handle for transport. There is plenty of room to get yourself organized!
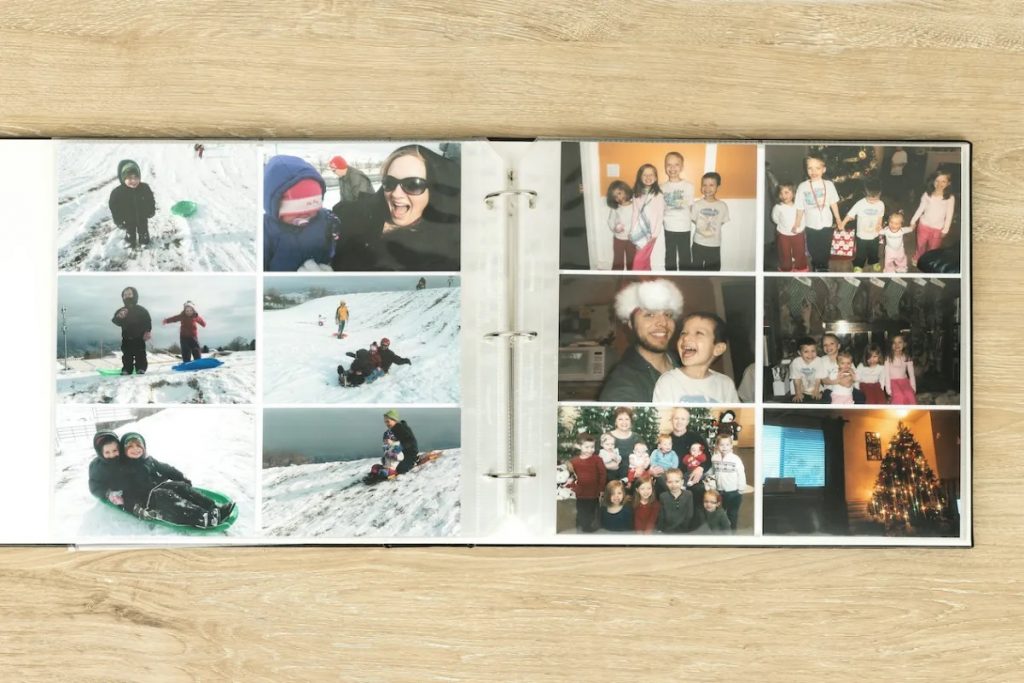
Option 2: Create a work-in-progress album.
Use one of our D-ring albums and divided Memory Protectors™ to separate out all the photos you’ll want for an album. You can group like photos together so you know how to plan your layouts.
(Going this route may even help you decide whether pocket scrapbooking is the way to go rather than traditional scrapbook layouts!)
And that’s it! The next step is to start scrapbooking away! If the idea of making the scrapbook pages themselves overwhelms you, a great place to start is with our scrapbooking workshop kits.
Breaking it down into steps really helps it seem a little more manageable, right? It’s so easy to become overwhelmed. But just like most things in life–consistency is key. Once you find a how-to process for organizing your photos, it’s just a matter of continuing to stay with it!